Working with JavaScript
What we'll learn
- How to send initial data when the app starts up
- How to call JavaScript code from your app
- How to use NPM modules and define web components
- How to use TypeScript instead of JavaScript
- How you can safely access environment variables
Getting started
Let's create a new Elm Land project, using the elm-land init command:
elm-land init working-with-jsNow that you have a new project, you can run it locally with the elm-land server command:
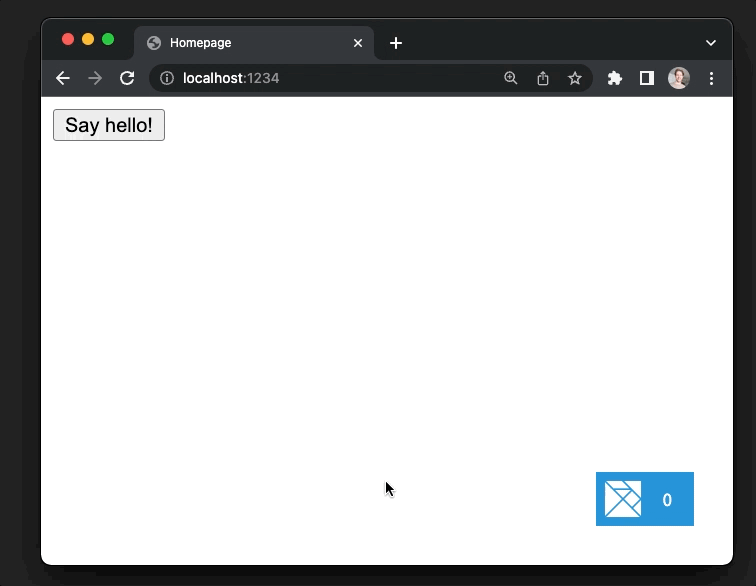
cd working-with-jselm-land serverNow you should see "Hello, world!" at http://localhost:1234
How Elm works with JavaScript
At a high-level, there are three ways that Elm programs can communicate with JavaScript code:
- Flags – Allows our Elm application to receive initial data before it starts up
- Ports – Allows Elm to send messages back-and-forth to your JavaScript code
- Web Components – Allows Elm to render HTML elements that do cool things!
In the Elm community, you'll hear the phrase "interop" being used. This just means "communication with JS"
This guide will introduce you to the src/interop.js file– the way Elm Land allows users to define all of these in their web applications.
Let's define an src/interop.js in our program that looks like this:
// This is called BEFORE your Elm app starts up
//
// The value returned here will be passed as flags
// into your `Shared.init` function.
export const flags = ({ env }) => {

}

// This is called AFTER your Elm app starts up
//
// Here you can work with `app.ports` to send messages
// to your Elm application, or subscribe to incoming
// messages from Elm
export const onReady = ({ app, env }) => {

}Sending initial data
Whenever we are working with JavaScript and Elm, we'll need to write a bit of code in both languages. For sending initial data, here are the two sides of the communication that we'll need to add:
The JavaScript side
Let's use the flags function to send a message to our Elm application when it starts up:
// ...

export const flags = ({ env }) => {
  return {
    message: "Hello, from JavaScript flags!"
  }
}

// ...To send flags into your Elm Land application, that's all we needed to do on the JavaScript side. Next, we'll write some Elm code, so that we can receive those flags and reply to our JavaScript application.
The Elm side
To receive the flags, we'll need to customize the Shared module. We can do this by using the elm-land customize command:
elm-land customize sharedThis will move three files into our src/ folder. For this example, we'll only need to worry about the src/Shared.elm.
Let's take a look at these two pieces of that file:
module Shared exposing (..)

-- ...

type alias Flags =
    {}


decoder : Json.Decode.Decoder Flags
decoder =
    Json.Decode.succeed {}

-- ...In Elm Land, our Shared module defines:
Flags– the type of value it expects to be sent from JavaScriptdecoder– how to get that value from raw JSON
By using a JSON decoder, we can make sure our Elm program doesn't crash– even if the JavaScript side sends us unexpected data.
Let's tell Elm to expect a message from JavaScript:
module Shared exposing (..)

-- ...

type alias Flags =
    { message : String
    }


decoder : Json.Decode.Decoder Flags
decoder =
    Json.Decode.map Flags
        (Json.Decode.field "message" Json.Decode.string)

-- ...Now that Elm knows to expect a "message" field with a String value from JavaScript– the result of the JSON decoding will be available to the Shared.init function.
We can use the Debug.log function to print this Result out the browser console. This will allow us to check if Elm received the message as expected:
module Shared exposing (..)

-- ...

init : Result Json.Decode.Error Flags -> Route () -> ( Model, Effect Msg )
init flagsResult route =
    let
        _ =
            Debug.log "FLAGS" flagsResult
    in
    ( {}
    , Effect.none
    )

-- ...If we visit http://localhost:1234, we'll see this message logged to our web browser's console:
FLAGS: Ok { message = "Hello, from JavaScript flags!" }Intentionally breaking stuff
Woohoo– our flags came in successfully! But what happens if JavaScript sends us something unexpected? Let's find out!
Make this change to src/interop.js, to try to crash the program:
export const flags = ({ env }) => {
  return {
    message: null
  }
}What do we see in the web browser? Our Elm app is still running, and we have safely captured the problem:
FLAGS: Err (Field "message" (Failure "Expecting a STRING" <internals>))Using JSON decoders to handle unsafe input from JavaScript is the easiest way to build reliable web applications, so that's the only way you can work with flags in Elm Land.
Calling JavaScript from Elm
If we want our Elm application to run some JavaScript code, we can use "ports" to send messages from Elm to JavaScript.
Ports are functions that can send JSON out to JavaScript, or send JSON from JavaScript back into Elm.
Just like with flags, this will involve adding code on both sides!
The Elm side
Although you can define ports in any module, we recommend only defining them in your Effect module. Let's customize the default Effect module using the elm-land customize command:
elm-land customize effectThis will create a new src/Effect.elm file. Let's add a new Effect for telling JavaScript to ask the user a question.
port module Effect exposing
( -- ...
, openWindowDialog
)
import Json.Encode
-- ...
type Effect msg
= -- ...
| SendMessageToJavaScript
{ tag : String
, data : Json.Encode.Value
}
-- ...
port outgoing : { tag : String, data : Json.Encode.Value } -> Cmd msg
Lets break down the changes we made to the default Effect module.
1. Defined our first port
Using the port keyword in the module definition allows our module to define ports. Without it, our application will see a compiler error from Elm:
port module Effect exposing
    ( -- ...
)Now that we have the port module set up, we can define a port called "outgoing" that will handle all events coming from Elm, out to JavaScript:
port outgoing :
    { tag : String
    , data : Json.Encode.Value
    }
-> Cmd msgWe use this port later when implementing toCmd, which turns our effect into a real Elm Cmd msg.
2. We defined a custom SendMessageToJavaScript effect
Whenever we add a new Effect msg, we'll need to add a variant to this custom type:
type Effect msg
    = -- ...
    | SendMessageToJavaScript
        { tag : String
        , data : Json.Encode.Value
}That leads to compiler errors that remind us to handle our new effect value in the existing map and toCmd functions. Here are the implementations for each:
map : (msg1 -> msg2) -> Effect msg1 -> Effect msg2
map fn effect =
    case effect of

        -- ... other branches

        SendMessageToJavaScript message ->
SendMessageToJavaScript messagetoCmd : { ... } -> Effect msg -> Cmd msg
toCmd options effect =
case effect of
-- ... other branches
SendMessageToJavaScript message ->
outgoing message3. We created a function called openWindowDialog
Instead of exposing the generic SendMessageToJavaScript value from this module, we define specific functions like openWindowDialog to make it easy for our code to perform side effects.
Otherwise, we might make typos with the tag field or get confused when encoding the JSON. Our openWindowDialog defines a nicer API for the rest of our code, so we expose that instead:
port module Effect exposing
    ( -- ...
    , openWindowDialog
    )

-- ...

openWindowDialog : String -> Effect msg
openWindowDialog question =
    SendMessageToJavaScript
        { tag = "OPEN_WINDOW_DIALOG"
        , data = Json.Encode.string question
}Now that we have defined our new outgoing port in Elm, we can use it in our JavaScript code.
The JavaScript side
Let's come back to src/interop.js, and add a few lines to the existing onReady function:
export const onReady = ({ app, env }) => {
  if (app.ports && app.ports.outgoing) {
    app.ports.outgoing.subscribe(({ tag, data }) => {
      // Print out the message sent from Elm
      console.log(tag, data)
    })
  }
}This bit of JavaScript code checks for the presence of app.ports.outgoing before subscribing to messages coming from Elm.
When a new message comes in, we should see a new log in the console with the data sent from Elm.
Running JavaScript at the click of a button
As one last step, let's add a "Say hello" button to the homepage, so we can see our new port in action! Let's start by replacing the homepage with one that can send effects:
elm-land add page /Let's add in a button on the page that will send our new Effect.openWindowDialog:
module Pages.Home_ exposing (Model, Msg, page)

import Html.Events
-- ...

-- ...

type Msg
    = UserClickedButton


update : Msg -> Model -> ( Model, Effect Msg )
update msg model =
    case msg of
        UserClickedButton ->
            ( model
            , Effect.openWindowDialog "Hello, from Elm!"
            )

-- ...


view : Model -> View Msg
view model =
    { title = "Homepage"
    , body =
        [ Html.button
            [ Html.Events.onClick UserClickedButton
            ]
            [ Html.text "Say hello!" ]
        ]
}Now when we visit http://localhost:1234 in our browser, we'll see a message logged to the console:
OPEN_WINDOW_DIALOG Hello, from Elm!This means our Elm application is successfully running JavaScript code. Let's make it more interesting by using window.alert when the tag received is "OPEN_WINDOW_DIALOG".
export const onReady = ({ app, env }) => {
  if (app.ports && app.ports.outgoing) {
    app.ports.outgoing.subscribe(({ tag, data }) => {
      switch (tag) {
        case 'OPEN_WINDOW_DIALOG':
          window.alert(data)
          return
        default:
          console.warn(`Unhandled outgoing port: "${tag}"`)
          return
      }
    })
  }
}
Using web components
Another great way to work with existing JavaScript libraries is to define custom web components that are rendered within your Elm application.
Just like a <div> or a <span>, you can render a <my-custom-thing> tag within your Elm application. That HTML element can be used to safely embed your own JavaScript components.
It's common to do this for things like Google Maps, or if you're embedding an existing React or Vue application within a mostly Elm app.
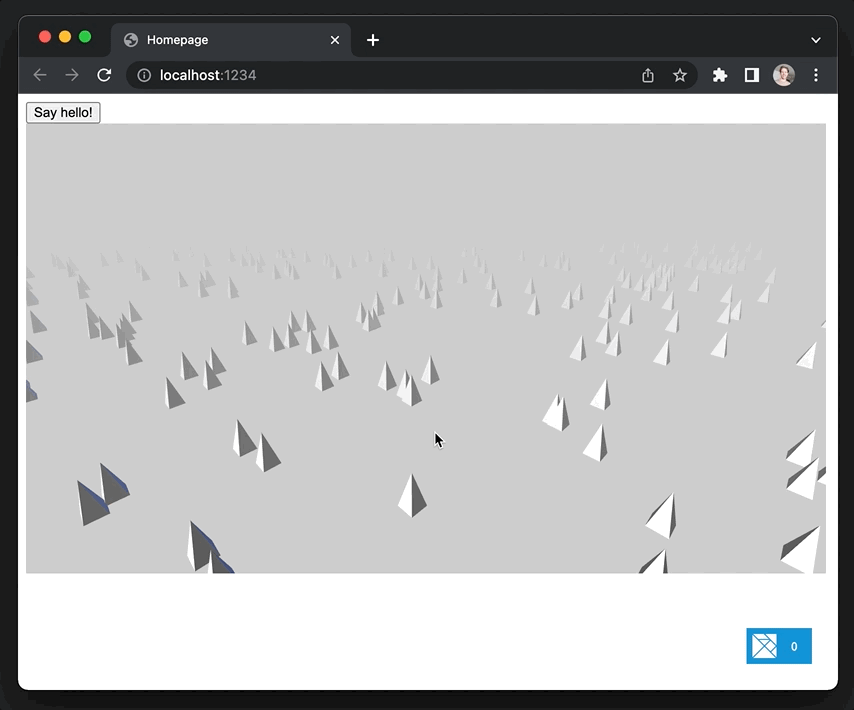
Let's use Three.js!
For this example, we are going to use the amazing Three.js library to embed a cool, interactive 3D scene in our Elm Land application.
Together we'll define a custom <forest-demo> component that will render this interactive Three.js example, complete with orbit controls and some example shapes:
The JavaScript side
1. Installing NPM modules
To work with JavaScript modules, we'll need to track our dependencies in a package.json file. This will make it easy to run npm install and get them again later.
Let's create a package.json file using npm:
npm init -yThis creates a new package.json file, and now we can install the three package as a NPM dependency:
npm install --save three2. Adding the web component
Next, we'll want to create a new file at src/web-components/forest-demo.js.
Copy the example snippet below, which is defined as a new custom web component:
//
// This code was taken from this Three.js example:
// https://github.com/mrdoob/three.js/blob/master/examples/webgl_lightprobe.html
//

import * as THREE from 'three'
import { OrbitControls } from 'three/addons/controls/OrbitControls.js'

window.customElements.define('forest-demo', class extends HTMLElement {
  connectedCallback() {
    let size = {
      width: 800,
      height: 450
    }

    let camera, controls, scene, renderer
    let self = this

    init()
    animate()

    function init() {
      scene = new THREE.Scene()
      scene.background = new THREE.Color(0xcccccc)
      scene.fog = new THREE.FogExp2(0xcccccc, 0.002)

      renderer = new THREE.WebGLRenderer({ antialias: true })
      renderer.setPixelRatio(window.devicePixelRatio)
      renderer.setSize(size.width, size.height)

      self.appendChild(renderer.domElement)

      camera = new THREE.PerspectiveCamera(60, size.width / size.height, 1, 1000)
      camera.position.set(400, 200, 0)

      // controls
      controls = new OrbitControls(camera, renderer.domElement)
      controls.listenToKeyEvents(window)
      controls.enableDamping = true
      controls.dampingFactor = 0.05
      controls.screenSpacePanning = false
      controls.minDistance = 100
      controls.maxDistance = 500
      controls.maxPolarAngle = Math.PI / 2

      // world
      const geometry = new THREE.CylinderGeometry(0, 10, 30, 4, 1)
      const material = new THREE.MeshPhongMaterial({ color: 0xffffff, flatShading: true })

      for (let i = 0; i < 500; i++) {
        const mesh = new THREE.Mesh(geometry, material)
        mesh.position.x = Math.random() * 1600 - 800
        mesh.position.y = 0
        mesh.position.z = Math.random() * 1600 - 800
        mesh.updateMatrix()
        mesh.matrixAutoUpdate = false
        scene.add(mesh)
      }

      // lights
      const dirLight1 = new THREE.DirectionalLight(0xffffff)
      dirLight1.position.set(1, 1, 1)
      scene.add(dirLight1)

      const dirLight2 = new THREE.DirectionalLight(0x002288)
      dirLight2.position.set(-1, -1, -1)
      scene.add(dirLight2)

      const ambientLight = new THREE.AmbientLight(0x222222)
      scene.add(ambientLight)

      window.addEventListener('resize', onWindowResize)
    }

    function onWindowResize() {
      camera.aspect = size.width / size.height
      camera.updateProjectionMatrix()
      renderer.setSize(size.width, size.height)
    }

    function animate() {
      requestAnimationFrame(animate)
      controls.update()
      render()
    }

    function render() {
      renderer.render(scene, camera)
    }
  }
})Now that we have that web component file, we'll need to import it into our src/interop.js file.
3. Using our web component
Back in src/interop.js, and this line to the top of your file:
import './web-components/forest-demo.js'

// ...The Elm side
Now that the new web component is defined, adding it to our Elm application will be easy.
In our src/Pages/Home_.elm file, let's add this line to our view function, just below our "Say hello!" button from earlier:
module Pages.Home_ exposing (Model, Msg, page)

-- ...


view : Model -> View Msg
view model =
    { title = "Homepage"
    , body =
        [ Html.button
            [ Html.Events.onClick UserClickedButton
            ]
            [ Html.text "Say hello!" ]
        , Html.node "forest-demo" [] []
        ]
}That's it! After adding that one line of Elm, you'll see the 3D scene is ready to interact with at http://localhost:1234:
Rules for Web Components
Web components are a great way to add JavaScript functionality to an Elm Land application. Here is some advice when using them in your own projects:
Don't make Elm and JS overwrite each other
In this example, our JavaScript component used
this.appendChildto insert elements inside of itself. For that reason, we made sure to use[]on the Elm side when defining the child list.If we didn't, Elm will try to overwrite the JS elements, leading to problems with the Virtual DOM and page rendering.
elm-- ✅ DO Html.node "forest-demo" [] [] -- 🚫 DON'T Html.node "forest-demo" [] [ Html.text "Hello from inside <forest-demo>!!" ]Check out Luke's awesome talk!
Luke Westby introduced how to reliably use web components with Elm in his Elm Europe 2018 talk.
This talk covers how to add HTML attributes, listen for changes to properties, and more! ( I can't recommend this resource enough, I reference it all the time )
Using TypeScript
All of the examples below were using a src/interop.js file to integrate with our Elm application. But what if you wanted to use TypeScript instead?
In Elm Land, you can upgrade any project to use TypeScript by renaming the file from interop.js to interop.ts.
It's really that easy!
What you can expect
- TypeScript compiler errors will be displayed in your web browser on save, just like the Elm ones!
- If you run
elm-land build, the command will let you know about any TypeScript compiler errors and fail the build. - You can add your own tsconfig.json file to the root of your project (alongside
elm.jsonandpackage.json), and Elm Land will automatically use that configuration.
Adding a tsconfig.json?
We recommend using this minimal configuration as a starter, to prevent emitting unused JS files when Elm Land automatically checks your project during elm-land server and elm-land build:
{
  "files": ["src/interop.ts"],
  "compilerOptions": {
    "lib": ["es6", "dom"],
    "noEmit": true,
    "strict": true
  }
}Environment variables
Elm Land allows you to safely access any environment variables from your src/interop.js file.
You may have already spotted the env variable available to both the flags and onReady functions:
// ...

export const flags = ({ env }) => {
  // ...
}

// ...

export const onReady = ({ app, env }) => {
  // ...
}By default, for security reasons, no environment variables are available. You'll need to edit your elm-land.json file's app.env property to allow your Elm application to access a given variable.
Be thoughtful about what you expose!
Any environment variables you expose in app.env will be accessible to anyone with access to your website. Be sure to keep private information or secrets out of your elm-land.json
Here's an example of exposing the NODE_ENV variable to your frontend:
{
  "app": {
    "env": [ "NODE_ENV" ],
    ...
  }
}Now that NODE_ENV has been listed as a variable, you'll have access to it within the env value passed into your Elm application.
You can test this out yourself in src/interop.js:
Add this
console.logwithin yourflagsfunction to see the value ofenv:js// ... export const flags = ({ env }) => { console.log(env) // ... } // ...Re-running
elm-land serverwith your environment variable set:shNODE_ENV=production elm-land serverCheck your web browser's console output:
txt{ "NODE_ENV": "production" }
Sending environment variables to Elm
As seen earlier in this guide, you can send this environment variable as initial data via flags or define an incoming port that sends it in at a later time.
From there, it's common to store your environment variables in your Shared.Model, which makes them accessible to any page that needs to use them!