Layouts
Overview
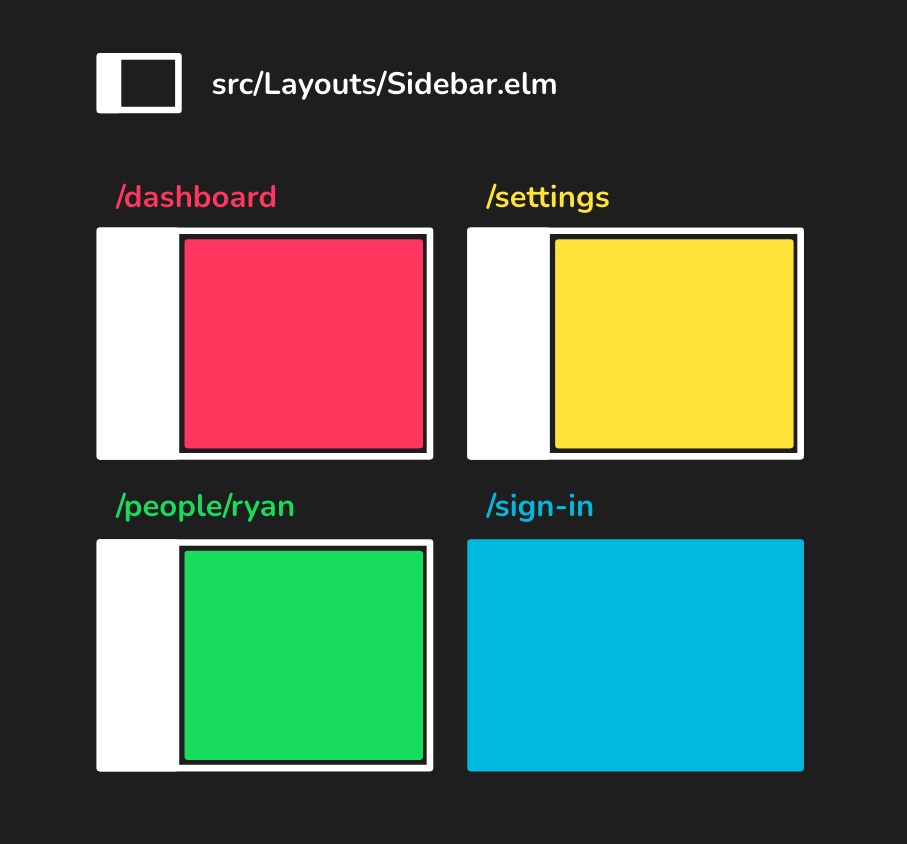
Layouts allow your pages to reuse stateful UI. They can save you time wiring things up, and prevent bugs that come from duplication across pages. In many web apps, you might have a common element, like a sidebar, that should be available across multiple pages.
In Elm Land, each page explicitly chooses the layout it wants to use. This design choice means there won't be any secret or "default" layouts. For example, if you have a sign-in page that you don't want to use your sidebar layout, that's totally fine!
In this guide, we'll learn how to create and use layouts.
Have you read about pages, yet?
If you haven't read the previous "Pages" section, we recommend you check that out first. Layouts won't make much sense until you know the basics of how pages work!
Adding layouts
To add a new layout, you can use the elm-land CLI tool:
elm-land add layout SidebarThis generates a new file at src/Layouts/Sidebar.elm, which looks like this:
module Layouts.Sidebar exposing (Props, Model, Msg, layout)

import Layout exposing (Layout)
-- ...


type alias Props =
    {}


layout :
    Props
    -> Shared.Model
    -> Route ()
    -> Layout () Model Msg contentMsg
layout props shared route =
    Layout.new
        { init = init
        , update = update
        , view = view
        , subscriptions = subscriptions
        }

-- ...This file should look somewhat familiar to you after reading the Pages guide. Let's compare the two functions side-by-side to understand what's changed:
-- PAGES
page : Shared.Model -> Route () -> Page Model Msg

-- LAYOUTS
layout : Props -> Shared.Model -> Route () -> Layout () Model Msg contentMsgAlthough some things are the same, there are two new types we haven't seen before:
PropsLayout () Model Msg contentMsg
Props
As we'll see in the "Using layouts" section below, it's common for pages to send data or other information to their layout. In Elm Land, the Props type defined in your layout file determines what information can be sent by a page.
For our new sidebar layout, let's say we always expect an Auth.User value. This way, we won't have to worry about what the sidebar looks like when a user is not signed in:
module Layouts.Sidebar exposing (Props, Model, Msg, layout)

import Auth
import Layout exposing (Layout)
-- ...

type alias Props =
    { user : Auth.User
    }


layout : Props -> Shared.Model -> Route () -> Layout () Model Msg contentMsg
layout props shared route =
    ...


-- ..."Whats an Auth.User?"
Elm Land comes with a system for making user authentication really easy!
We briefly covered this in the "User authentication" section in the Pages guide. Later on, in the Auth section, we'll learn more about how the User value works.
( For now, here's all you need to know: if any page or layout has access to an Auth.User value, that view will only be visible for signed-in users. )
Layout () Model Msg contentMsg
Our layout function returns a Layout type. This Layout type bundles up all the settings for how to render a layout.
There are four parameters on the Layout type:
()– This is a placeholder for "parent props" which, we'll cover in the Nested layouts section below.Model– This means ourLayoutwill store aModelto track it's local stateMsg– Says ourLayoutwill send theseMsgvalues when user events occur.contentMsg– This last parameter allows the layout'sviewfunction to embed the page's HTML anywhere in our layout.
Understanding layouts
Layouts are very similar to pages, and even have identical init/update/subscriptions functions.
But here's what makes the layout's view function unique:
- It allows you to embed other page or layout HTML anywhere you like.
- It supports nesting layouts to save you time and prevent bugs.
Here is a closer look at the four functions used in every layout:
init
This function is called anytime your layout loads.
init : () -> ( Model, Effect Msg )
init _ =
...update
This function is called whenever a user or the browser sends a message.
update : Msg -> Model -> ( Model, Effect Msg )
update msg model =
...view
This view function converts the current model to the HTML you want to show the user.
view :
    { model : Model
    , toContentMsg : Msg -> contentMsg
    , content : View contentMsg
    }
    -> View contentMsg
view { model, toContentMsg, content } =
..."Wait, what's up with 'content' and 'toContentMsg'?"
Unlike a page's view function, layouts also have access to a content argument. The content value allows you to embed the inner page (or nested layout) anywhere you like within your layout.
To allow you to mix this layout's Html Msg with the inner content's Html contentMsg, you'll have access to the toContentMsg function. This is commonly used with Html.map to make sure that a single Html contentMsg value is returned by the view function.
Here's an example of how you would use these two values in a real layout:
view :
    { model : Model
    , toContentMsg : Msg -> contentMsg
    , content : View contentMsg
    }
    -> View contentMsg
view { model, toContentMsg, content } =
    { title = content.title ++ " | My app"
    , body =
        [ -- View the sidebar
          viewSidebar model
            |> Html.map toContentMsg
          -- View the inner content
        , div [ class "page" ] content.body
        ]
    }

viewSidebar : Model -> Html Msg
viewSidebar model =
aside [ class "sidebar" ] [ ... ]Here are some highlights from the code snippet above:
- On line 8, we appended
" | My app"to the end of whatevertitlecame in from the content in this layout.- Let's imagine that our
Page.Settingsfile is using this sidebar layout. - If the
Page.Settings.viewfunction returned the title"Settings", we would see"Settings | My app"as the tab title displayed for this page.
- Let's imagine that our
- On line 12, we used the
toContentMsgfunction along with toHtml.map. This converts theHtml Msgvalue returned byviewSidebarinto the expectedHtml contentMsgvalue ourviewfunction needs to return. - On line 14, we embedded the HTML content from our page into a
<div class="page">tag.- If we were on the
Settingspage, thencontent.bodywould be the exact HTML content returned by thePage.Settings.viewfunction.
- If we were on the
- On line 18, we use a capitalized
Msgtype in the HTML value we returned. This means ourviewSidebarcan send messages in this function, which is important for interactive layouts!
subscriptions
This function listens for ongoing events like "window resized" or "javascript sent a message" and forwards that as a Msg for the update function to handle.
subscriptions : Model -> Sub Msg
subscriptions model =
...Removing layouts
Just like we saw with pages, there's no special command for removing layout files. To remove a layout, you can either delete the file in your file explorer, or from your terminal:
rm src/Layouts/Sidebar.elmElm Land will clean up the generated Layouts.Sidebar custom type variant, and the Elm compiler will let you know if any pages are impacted.
Using layouts
Although most of our pages should have a sidebar, there are certain pages that shouldn't. One common example of this is the "Sign in" page. Elm Land allows each pages to opt-in to use a layout.
For that reason, there is no default layout, or other mechanism to hide which layout a page is using. You can use the Page.withLayout function, documented in the "Page" module reference, to add a layout to a page:
module Pages.People exposing (Model, Msg, page)

import Page exposing (Page)
import Layouts
-- ...


page : Auth.User -> Shared.Model -> Route () -> Page Model Msg
page user shared route =
    Page.new
        { init = init
        , update = update
        , view = view
        , subscriptions = subscriptions
        }
        |> Page.withLayout (toLayout user)


{-| Use the sidebar layout on this page -}
toLayout : Auth.User -> Model -> Layouts.Layout Msg
toLayout user model =
    Layouts.Sidebar
        { user = user
}Here are the important things to know when using a layout:
- On line 4, we import a
Layoutsmodule. This module is updated anytime you add a new layout insrc/Layouts. It provides a "custom type" with all possible layouts in your application.- Note: This is distinct from the
Layoutmodule, which is used for defining layouts
- Note: This is distinct from the
- On line 16, we use the Page.withLayout function to tell Elm Land which layout we'd like our
Settingspage to use.- Note: Because it is within the
pagefunction, you'll be able to access values likeuserand pass them along to yourtoLayoutfunction.
- Note: Because it is within the
- On line 20, we define a
toLayoutfunction. This function has access to theModel, in case the layout we should use is based on the state of our page.- It uses the
Layouts.Sidebarvariant from theLayoutsmodule - It passes in the
Layouts.Sidebar.Propsvalue, so our layout is provided thesettingsit expects
- It uses the
When we go to the /settings page, you'll see that Elm Land has embedded the Page.Settings page inside the Layouts.Sidebar layout. You can repeat this process with as many pages as you want.
Nested layouts
When we created Layouts.Sidebar, we created a normal top-level layout file. Just like pages use a file-naming convention to determine URL routing, layouts use a file-naming convention to support nesting layouts within each other.
One example of a nested layout could be if you're trying to standardize pages that use a sidebar and a header. Rather than reimplementing the sidebar layout in a separate layout, Elm Land lets you create a Layouts.Sidebar.Header that's automatically embedded in your existing Layouts.Sidebar file:
elm-land add layout Sidebar.HeaderThis command will create a file at src/Layouts/Sidebar/Header.elm. This new layout file will include a way to provide Layouts.Sidebar.Props into the parent component:
module Layouts.Sidebar.Header exposing (Props, Model, Msg, layout)

import Layout exposing (Layout)
import Layouts.Sidebar
-- ...


type alias Props =
    { title : String
    , user : Auth.User
    }


layout :
    Props
    -> Shared.Model
    -> Route ()
    -> Layout Layouts.Sidebar.Props Model Msg contentMsg
layout props shared route =
    Layout.new
        { init = init
        , update = update
        , view = view
        , subscriptions = subscriptions
        }
        |> Layout.withParentProps
            { user = props.user
}Here are a few differences between a nested layout and the standard one we saw earlier in this guide:
- On line 18, you'll see the first argument of your
Layouttype holds the parent props.- In this case, our parent layout props type is
Layouts.Sidebar.Props
- In this case, our parent layout props type is
- On line 26, we need to pass those
Layouts.Sidebar.Propsin.- Because we are within the
layoutfunction, we have access to our ownprops - This gives our sidebar layout access to the
uservalue it expected.
- Because we are within the
Usage example
Now that we have a Layouts.Sidebar.Header, we can use it on a page. Using a nested layout on a page works exactly like any other layout.
You'll be able to follow the same steps as shown earlier in the "Using layouts" section:
module Pages.Settings exposing (Model, Msg, page)

import Layouts
-- ...

page : Auth.User -> Shared.Model -> Route () -> Page Model Msg
page user shared route =
    Page.new
        { init = init
        , update = update
        , view = view
        , subscriptions = subscriptions
        }
        |> Page.withLayout (toLayout user)


toLayout : Auth.User -> Model -> Layouts.Layout Msg
toLayout user model =
    Layouts.Sidebar_Header
        { title = "Settings"
        , user = user
}Sending messages to pages
Earlier, we saw the view function allowed us to embed a page's HTML anywhere within a layout. In many web applications, you'll also want to embed page content in other places.
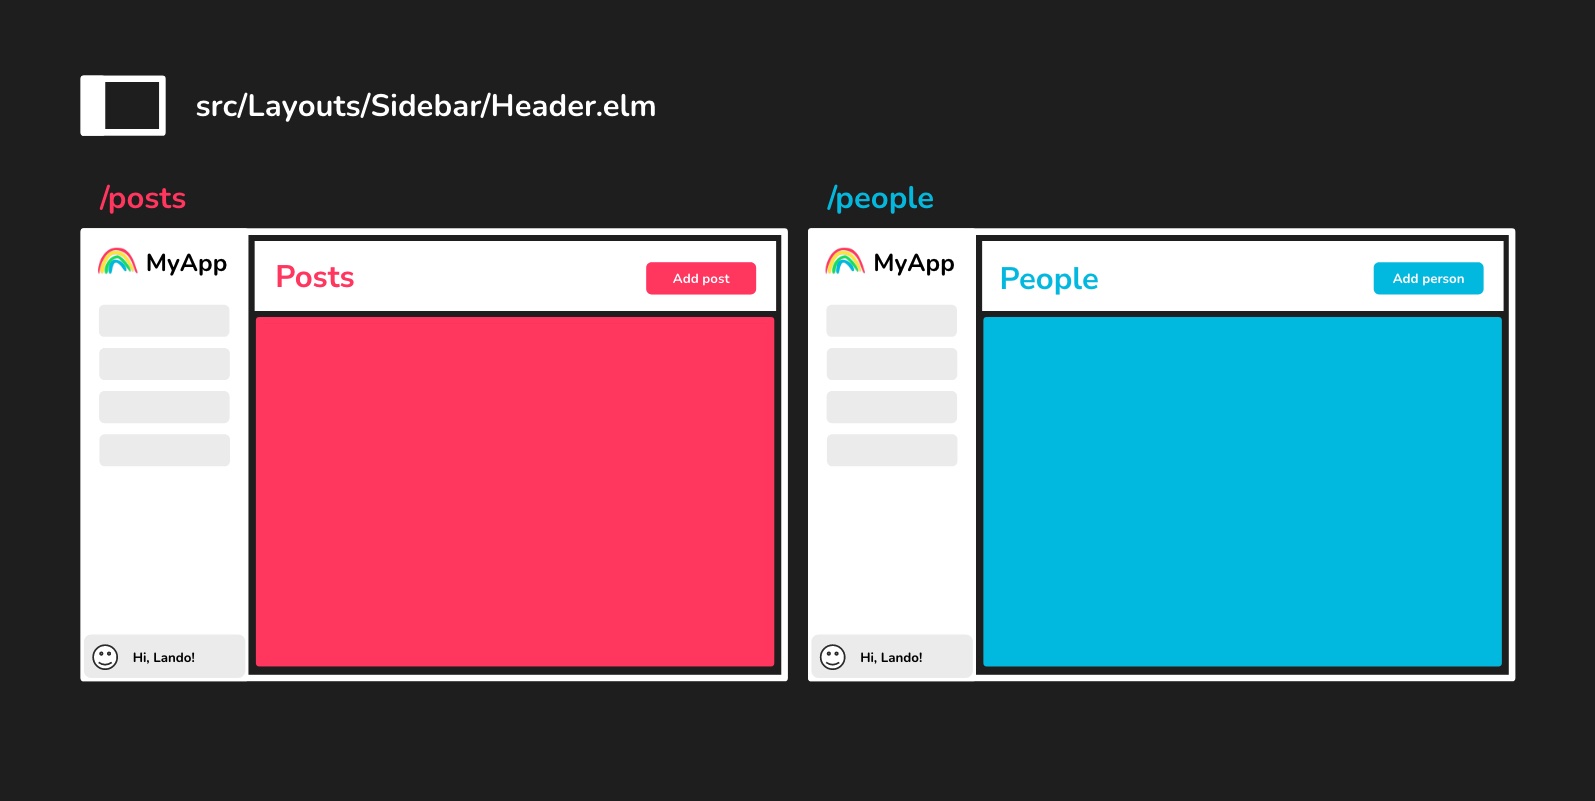
In the example above, we want to reuse all the layout and logic in our Layouts.Sidebar.Header, but we want to customize the button that appears in the top right corner of our header. Additionally, we want the individual page to handle the logic for "Add person" or "Add post".
Upgrading our Props
In order to accomplish this, we'll need to update our Props type to support rendering HTML with a contentMsg type variable:
-- BEFORE
type alias Props =
    { title : String
    }

-- AFTER
type alias Props contentMsg =
    { title : String
    , button : Html contentMsg
}By adding this variable, we'll be able to embed that button anywhere we like in our layout's view function.
Usage example
Here's a quick example, because you're worth it!
Updating the layout file
module Layouts.Sidebar.Header exposing
    ( Props, Model, Msg, layout
    , map
    )

import Layout exposing (Layout)
-- ...


type alias Props contentMsg =
    { title : String
    , button : Html contentMsg
    }


map : (msg1 -> msg2) -> Props msg1 -> Props msg2
map fn props =
    { title = props.title
    , button = Html.map fn props.button
    }


layout :
    Props contentMsg
    -> Shared.Model
    -> Route ()
    -> Layout Layouts.Sidebar.Props Model Msg contentMsg
layout props shared route =
    Layout.new
        { init = init
        , update = update
        , view = view props
        , subscription = subscription
        }
        |> Layout.withParentProps { user = props.user }


-- ...


view :
    Props contentMsg
    ->
        { model : Model
        , toContentMsg : Msg -> contentMsg
        , content : Html contentMsg
        }
    -> Html contentMsg
view props { model, toContentMsg, content } =
    { title = content.title
    , body =
        [ header [ class "header" ]
            [ h1 [ class "title" ] [ text props.title ]
            , div [ class "right-controls" ]
                [ props.button
                ]
            ]
        , div [ class "content" ] content.body
        ]
}Here are some things to keep in mind:
- You can pass along
propsvalue into yourviewfunction, just like we saw in the pages section (see line 32) - Be sure to add the
contentMsgparameter everywhere you seePropsin this file
What's up with that map function?
When you add the contentMsg variable to your Props type, Elm Land will ask you to define a map function to help convert your Props type from one contentMsg to another.
This is essential for the generated code to connect this layout to the top-level application!
Using the layout on a page
module Pages.People exposing (Model, Msg, page)

import Layouts
-- ...

page : Auth.User -> Shared.Model -> Route () -> Page Model Msg
page user shared route =
    Page.new { ... }
        |> Page.withLayout (toLayout user)


toLayout : Auth.User -> Model -> Layouts.Layout Msg
toLayout user model =
    Layouts.Sidebar_Header
        { title = "People"
        , button = viewAddPersonButton model
        }


viewAddPersonButton : Model -> Html Msg
viewAddPersonButton model =
    button
        [ onClick ClickedAddPerson ]
        [ text "Add person" ]

-- ...Under the hood, Elm Land will take care of converting your page's Html Msg into the Html contentMsg passed into your layout.
"Not just for HTML!"
Upgrading your Props to Props contentMsg also opens up the possibility of sending messages from a layout to a page:
type alias Props contentMsg =
    { title : String
    , onWindowResize : { width : Int, height: Int } -> contentMsg
}You can use this feature to allow pages to respond to events sent from your layouts.